Showing posts with label Sponging. Show all posts

Thursday, December 1, 2011

12 Days of Christmas Nails: Day 1

It's December! My countdown to Christmas has officially started and I'll be documenting it on my nails (of course!). It's my plan to post 12 Holiday themed manicures before Santa pays a visit . Apologies in advance if I don't manage to post 12 but I'll try my best!


I used A-England Galahad* as a base and sponged on Barry M Blue Glitter from the tips. I stamped the snowflake from Bundle Monster plate BM14 and finished it with a rhinestone and a top coat of NYC.


TwitterBloglovin'Tumblr

Wednesday, October 26, 2011

Day 17: Glitter

So today we come to Glitter manicures. Glitter and I have a strained relationship. I go through phases of loving it and at other times I just detest the stuff and get the urge to throw away every polish I own that contains glitter! The main reason for the hatred is the hassle it takes to remove it. I always use the foil method for removal these days to minimise any stress!

Don't forget to check out Cristina and Rie's glittery nails too!


Barry M Blue Glitter
BYS Gold Finger sponged from the tips down


TwitterBloglovin'Tumblr

Friday, September 2, 2011

Nebula Nails... Take Two

I posted my first set of Nebula Nails all the way back in February [here] and I decided yesterday that I wanted to give them another shot. This look is still really popular and so easy to do. You just cannot get them wrong!

I think I may have gone a bit overboard with these though. There are crazy colours and some irrational sponging involved. But as I said, they just work, and somehow always will as long as you have a sponge and some glitter!


Here are the polishes I used clockwise from top middle:
W7 - Purple Paradise
E.L.F - Twinkle
GOSH - Holographic
George @ Asda - Buttercup Shine
Collection 2000 Hot Looks - Dynasty
George @ Asda - Cloudless Sky
Wet N Wild - White


TwitterBloglovin'Tumblr

Sunday, July 24, 2011

Meet EOTD and NOTD. They're twins!

I've been trying to create a video tutorial for a Smokey Eye look all week after someone requested it on Facebook but it seems like the world is against me on this one.
The first time I tried, I just didn't get good enough footage because I'm still a rookie. On my second attempt, I got the footage but it refuses to play on my computer. It just crashes any software that I try to open it with, including the editing program! Très frustrating! 

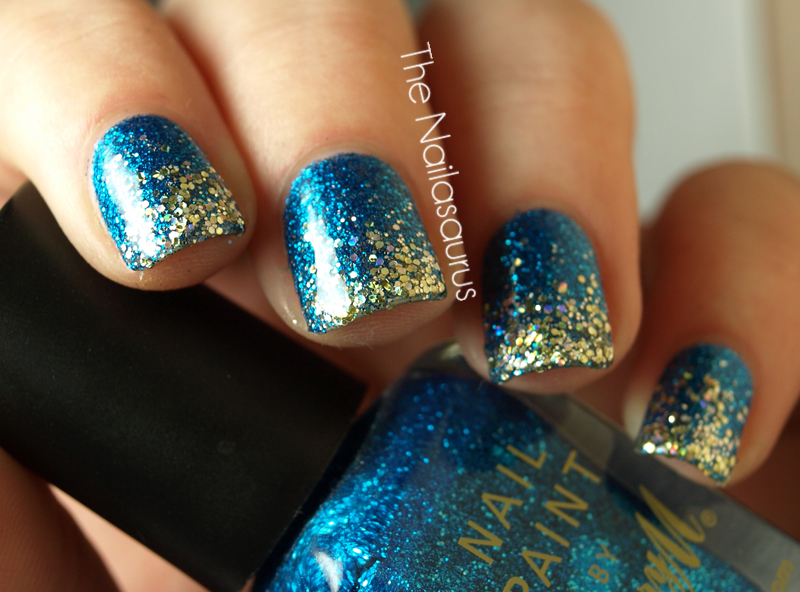
So anyway, here are my takes on the ever classic smokey eye and it's companion, the smokey nail!


I used:
E.L.F. Eyelid Primer
Bourjois Eyeshadow - Blanc
17 Solo Eyeshadow - Thunderbolt
MUA Eyeshadow - Shade 20
E.L.F. Cream Eyeliner - Black
Jerome Alexander Mascara


I think I'll try one more time to make a tutorial for this look but if the universe can find yet another way to tell me that it's just not meant to be, I'll have to concede!


I created a (sort of) gradient using one sponge and three colours. I utilised a combination of dabbing and dragging the sponge
Collection 2000 - White
La Femme - Grey Cream
Rimmel - Black Satin
Top coat of NYC


I'm going camping this week so I won't be blogging. I have one holiday inspired nail art post scheduled for Wednesday and I should be back to blogging by the weekend.

Saturday, April 2, 2011

The Nailasaurus is One Year Old!

It was my blog's birthday last night and I missed it. I saw that Steph @ Imperfectly Painted is having a blogaversary giveaway so I decided to have a look back and see when my first post was because I knew it must be coming up to a year and it was exactly one year to the day! I feel kinda bad that I missed it. Like I should have had a giveaway, or at the least a post, prepared but oh well. I'm planning a giveaway soon to make up for it.

I got Juicy Jules last weekend and I'm infatuated with it! It is without doubt THE sparkliest polish I own and it's just stunning in the sun. I plan on wearing it a lot in the summer.


The base colour is Urban Outfitters Matte Black and I used a sponge to apply the Juicy Jules to the tips in a gradient.
I used two coats of NYC to finish it off.


And out of focus so you can see all the amazing holographicness of the glitter...